3D Modelling Project 1
3D Modelling
Name : Chan Huei Lian (0351597)
3D Modelling | Bachelor of Design in Creative Media | Taylor's University
Project 1 : Hard Surface Modelling
INSTRUCTIONS
Project 1 brief
LECTURE
Week 3 : Briefing
Mr. Kamal briefed us about project 1, which we have to create a hard surface modelling for an object such as vehicle, weapon or robot. We need to find photos or reference blueprints of the object we want to model.
Week 4 : Tutorial
Mr. Kamal tutored us on knife modelling to get the general knowledge about hard surface modelling before jumping into project 1. (Full elaboration can be read here in Exercise page.)
Week 5 : Tutorial
We had a tutorial session with Mr. Kamal about rendering and materials.
Week 6 : Tutorial
We had a tutorial session with Mr. Kamal about texturing.
PROGRESSION
Week 4
.png) |
| Gun picture references on Google. |
I found some blueprints on various objects, such as train, helicopter, gun, rifle. I have not decided which to go for because I'm still not sure which is more workable for me so that I don't overwhelm myself with too difficult model, but all of them look difficult lol.

Week 7
I tried to make the helicopter, but I think its out of my league hahaha, so I switched to a pistol.
Helicopter modelling progress. (The mirror tool is sometimes confusing)
Pistol modelling progess.
Use boolean to make the uneven surface.
I find that it is especially hard for surface modelling, such as these parts below :
The gun trigger has an uneven surface, which really took me a long time to figure out how. Testing with the combination of extrude, inset faces, move tool, scale tool, knife tool helped me alot on this.
Same issues with the above surface modelling.
Completed modelling part. (Ver 1) -might have some changes afterwards.
I found some minor problem with the gun model, which there is a subtle line on the surface, so I resolve it by using knife tool to create horizontal wireframes or dissolving some edges to make the surface even.
there is a line beside after the surface modelling.
create a few horizontal line to wireframe, connect between the surfaces. I found that this way is effective to make sure the surface is not distorted like having the faint line as before.
Complete modelling second ver.
After finishing the modelling process of the gun, I wanted to start shading or texturing, but I am quite clueless about these two functions, so I'm gonna rewatch the lecture session recording first before I proceed. I watched a youtube tutorial on texturing a gun, and followed the steps, but did not get the exact texture that feels metallic enough.
Main steps of shading :
1) Go to shading window.
2) Select new material (to get 2 main nodes : Principle node, and Output node.).
3) In principle node, set base colour according to preference / object. (in this case, its black)
4) I used a few different nodes : colour ramp, noise texture, texture coordinate, mapping, MixRGB.
First try on shading. (does not give a metallic feel to me)
Distortion option under Noise Texture Node kinda help with the metallic feel more than before.
Much better, with the manipulation on a few connecting nodes below :
Add another copy of noise texture, change value of scale to 8, roughness down to 0.6, and distortion to 0. Then, connect its "Fac" to "colour 2" in MixRGB node.
Another experimentation : by manipulating the two gradient colour value in colour ramp, you can achieve some kind of smooth metal-ish like above.
Progression with shading (19/5).
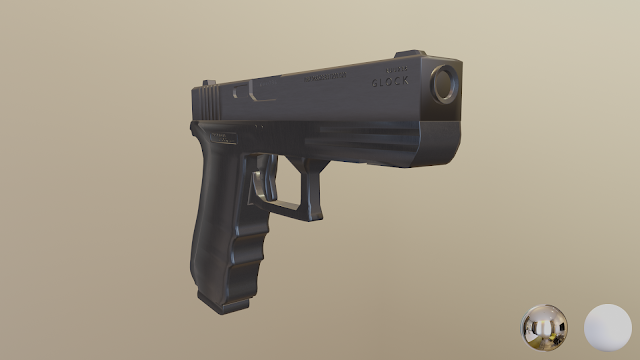
FINAL SUBMISSION SKETCHFAB & VIEWPORT RENDERING IMAGE
Classic Modern Hand Gun.
REFLECTION :
The whole process of project 1 was really hectic and full of trials and errors. Without a doubt, there were many times that I feel very frustrating and stressful in the modelling process because it was getting harder to keep up with the techniques being taught in lectures as I am a slow learner. There are a lot of tools to be familiarised with, especially when it comes to shading stage. The nodes have a really wide range and hence were really confusing. Youtube tutorials and rewatching lecturer's tutorial recording helped me to somehow complete this task. The hardest and longest part of this assignment is the surface modelling for me, but not to deny that it is also the fun part of modelling. Creating uneven surface while maintaining the balance of the object is challenging. Nevertheless, Im glad that I could complete this task in time. There are still many types of materials that I would love to explore in the future.


.png)
.png)
.png)
.png)
.png)
.png)
.png)
.png)
.png)
.png)
.png)
.png)
.png)
.png)
.png)
.png)
.png)
.png)

.png)
.png)
.png)
.png)


Comments
Post a Comment